


Woodpeckers Drill Press Table Package, Kit 1, Complete Kit with Work Surface, Clamps, Fence and Stops
Details
- BrandWoodpeckers
- Power SourceManual
- Voltage24 Volts
- Amperage10 Amps
- Maximum Chuck Size0.5 Inches

Description
🛠️ Elevate Your Drill Press Game with Precision & Power!
- READY TO WORK KIT - All-in-one package designed for 12-inch+ drill presses, making setup effortless and professional.
- DURABLE DUAL T TRACKS - Anodized, laser-engraved T-tracks ensure wear resistance and exact measurement every time.
- MICRO DOT MAGIC SURFACE - Unique double-sided micro-dot laminate reduces friction, keeping your workpiece steady and scratch-free.
- PRECISION PERFECT FENCE - 36-inch engraved fence with zero-centered bracket for flawless alignment and smooth locking.
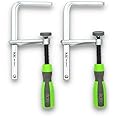
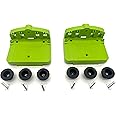
- COMPLETE CLAMPING CONTROL - Includes molded flip stops and hold-down clamps for secure, tear-out-free drilling.
The Woodpeckers Drill Press Table Package Kit 1 is a comprehensive upgrade for 12-inch and larger drill presses, featuring a 16x23 inch micro-dot laminated MDF work surface, dual anodized T-tracks with laser-engraved scales, and a 36-inch precision fence. This kit includes essential accessories like molded flip stops, hold-down clamps, and a filler block, delivering professional-grade accuracy, durability, and ease of use for serious woodworking and metalworking projects.
Specifications
| Brand | Woodpeckers |
| Power Source | Manual |
| Voltage | 24 Volts |
| Amperage | 10 Amps |
| Maximum Chuck Size | 0.5 Inches |
| Color | White Red |
| Included Components | Table, 36 Inch Fence, 2 Molded Flip Stops, 2 Hold Down Clamps, 1 Filler Block |
| Special Feature | Engraved |
| Material | Composite |
| Item Weight | 15.6 Pounds |
| Drill Type | Drill Press |
| UPC | 723434973572 795092909729 689076666206 |
| Drilling Capacity Wood | 2 Inches |
| Manufacturer | Woodpeckers Inc. |
| Drilling Capacity Metal | 2 Inches |
| Part Number | WPDPPACK1 |
| Item Weight | 15.55 pounds |
| Product Dimensions | 37.25 x 16.5 x 2.5 inches |
| Item model number | WPDPPACK1 |
| Is Discontinued By Manufacturer | No |
| Style | Package 1 |
| Item Package Quantity | 1 |
| Number of Handles | 1 |
| Special Features | Engraved |
| Batteries Included? | No |
| Batteries Required? | No |
Reviews
S**E
Great Table.. Method to install could be inproved and here it is..
This product screams quality the second you take it out of the box and that deserves 5 stars. Some may say it's 'pricey' but do the math and to buy everything it would cost the same or more if you made it yourself. The installation for this is for ‘certain’ drill presses, other’s require using a piece of plywood. In both cases this results in the purchaser drilling holes and placing wood screws into the MDF material. Over time this will weaken the material where the screws will not hold especially if you ever take the drill press table off.Below are pictures I took of an install method I used on the Porter Cable drill press sold at Lowes. (hey the drill press only cost me $85 LOL) This is one of those “other” tables that the supplied materials will in no way work to install this. When installed this way on any table, there are no holes drilled or wood screws put in the top making it much better than the instructions by Woodpeckers. Only the existing holes are used. The big positive is that any clamping is super secure, and no wood screws will be pulled out of MDF, because no wood screws are used. It can also be attached with wingnuts so the table can be removed if needed, and reattached in seconds. All you need to do is purchase about $5 more in bolts, wingnuts, screws, and washers. If you have any skill at all this should take no more than 1 hour to to do. The completed table will take over 1000 of pounds of force and nothing will pull out, or pull off. Perfect if you ever use this with a mortising attachment and clamp to this.Purchase 8 countersink screws ¼” in diameter with the exact same tread as the ones that hold down the miter track on the table, just half an inch longer. Purchase 4 carriage bolts 2.5” with wingnuts (or nuts) and washers.1. Cut a piece of ¾ plywood just slightly smaller than the table top2. Drill holes in the plywood in the exact same position as the holes in the table top. The holes along the side after the main hole is drilled, use a chamfer bit for a countersink screw. So they will pull beneath the plywood when the screws are tightened.3. Drill 4 holes in your cast iron top. Yes this is the tricky part but it’s much easier than you think it would be. Make sure they are far enough away from the cast iron table center hole. Make a larger hole than the bolt you use so there can be some adjustment later.4. Place the cast iron table upside down on the bottom of the plywood with the holes drilled in it to match the drill press table. A good way to make sure everything is centered when placing upside down is to place a Forsner bit the same diameter as the middle hole in the cast iron top in the same hole as the center of the plywood.5. Mark the 4 holes you placed in the iron table on the plywood, and drill the holes.6. On the top side of the plywood, use a Forsner bit the same diameter of the carriage bolts drill down about ¼” so the bolt head will be below the surface when tightened. Put the 4 carriage bolts in the plywood.7. Place the drill press table on the plywood, place in the screws through the top to the channels for the fence tracks, everything should line up and tighten.8. Place the drill press table on the cast iron table through the holes you just made, and align everything dead center, then tighten the nuts or wingnuts.
M**L
Well made in USA
This table is a great example of good design and materials producing a great product. Easy to read scales for quick setup, Stable, solid platform and nice functioning clamps.Mounting system is straight forward and secure. Easy removal for metal work is a big plus. The hard wear surface is textured for just the right amount of slip while positioning your work.Nice red anodising on the scales provides good contrast and should last years.Get the optional high fence and you are good to go.
J**L
Good quality and simple design
I have only installed this. It was a Christmas gift. The parts are well made. Very solid and quality construction. The packaging was very adequate. Everything was protected.If your drill does not have through holes in the table, you wil either have to drill them or you have to make a top to go between your drill press table and the woodpecker table. That is a little frustrating and the only reason I gave it a 4. I chose to simply drill 4 holes in my table. No big deal.The table assembled and installed in 30 minutes or so. Very easy once you get past the decision to drill holes in you table.This unit came with two stops and two clamps. Very nice and the same anodized aluminum as the rails. The rails have very clearly marked measurements. The table also has a sacrificial center that is super easy to replace with MDF. Lastly, the table has what seems to be a very solid laminate that should be very easy to slide pieces on and should be pretty robust.
S**Y
Table required fabricating more parts to fit my existing drill press. Why buy a complete kit if I have to fabricate??
I wound up returning this item because deep into the assembly instructions it tells you that if you have a slotted drill press table, you'll have to either drill holes in your existing drill press table to mount the woodpeckers one, or make an adaptor piece out of 3/4" plywood. I am using a Grizzly G7947 drill press, and this did not fit on it.Frankly, I bought this as a "ready to use" drill press table to save time/energy. Once I cross the line into having to make another piece to mount this to my new drill press (no way I'm drilling holes in my existing drill press table), I'm going to just build my own.In the end, I made my own table out of 2 layers of 3/4" marine plywood and some formica I had laying around the shop, and ordered the "DP Track Kit" from Woodpeckers which is this exact track and back gauge kit. I installed the DP track kit in my table and saved myself about $100 in the process. I do feel the tracks with their rulers etched in have value, and the stops work well, so the track kit is a winner. A table made of 2 layers of marine plywood will last significantly longer than a table made of MDF, especially in a humid environment.Woodpeckers needs to update their specs - and their instructions - on this to prevent people like myself from ordering it only to find out deep into the instructions that it won't work on their existing tables.Woodpeckers needs to either modify their table
S**R
Think through the install, great table.
Mounted this to a Jet table with t-slots. If you take your time laying out, 4 holes 25% of the table thickness deep with a forstner bit then through drilled with a 1/4” brad point will provide a flat bottom for the nuts and washers fastened from the top and keep them below the work surface. Nuts on top will keep you from over tightening and damaging the board. Well thought out design which allows repeatable and accurate layout. Quality is spot on. It takes a minute to get used to using this style of clamp, but once you get the hang of it, they’re ok. The stops are great. I will likely buy the taller fence but that doesn’t equate to the included one having any problems. Application specific is all. I own quite a few Woodpecker products, they never disappoint and this one is no exception. Well worth the investment.
Common Questions
Trustpilot
1 week ago
1 month ago
Get the App
