We remain fully operational. Our teams are working around the clock to ensure your deliveries continue safely.

DOWNLOAD THE APP


Customer Services
Copyright © 2025 Desertcart Holdings Limited
DOWNLOAD THE APP

Buy anything from 5,000+ international stores. One checkout price. No surprise fees. Join 2M+ shoppers on Desertcart.
Desertcart purchases this item on your behalf and handles shipping, customs, and support to Cameroon.
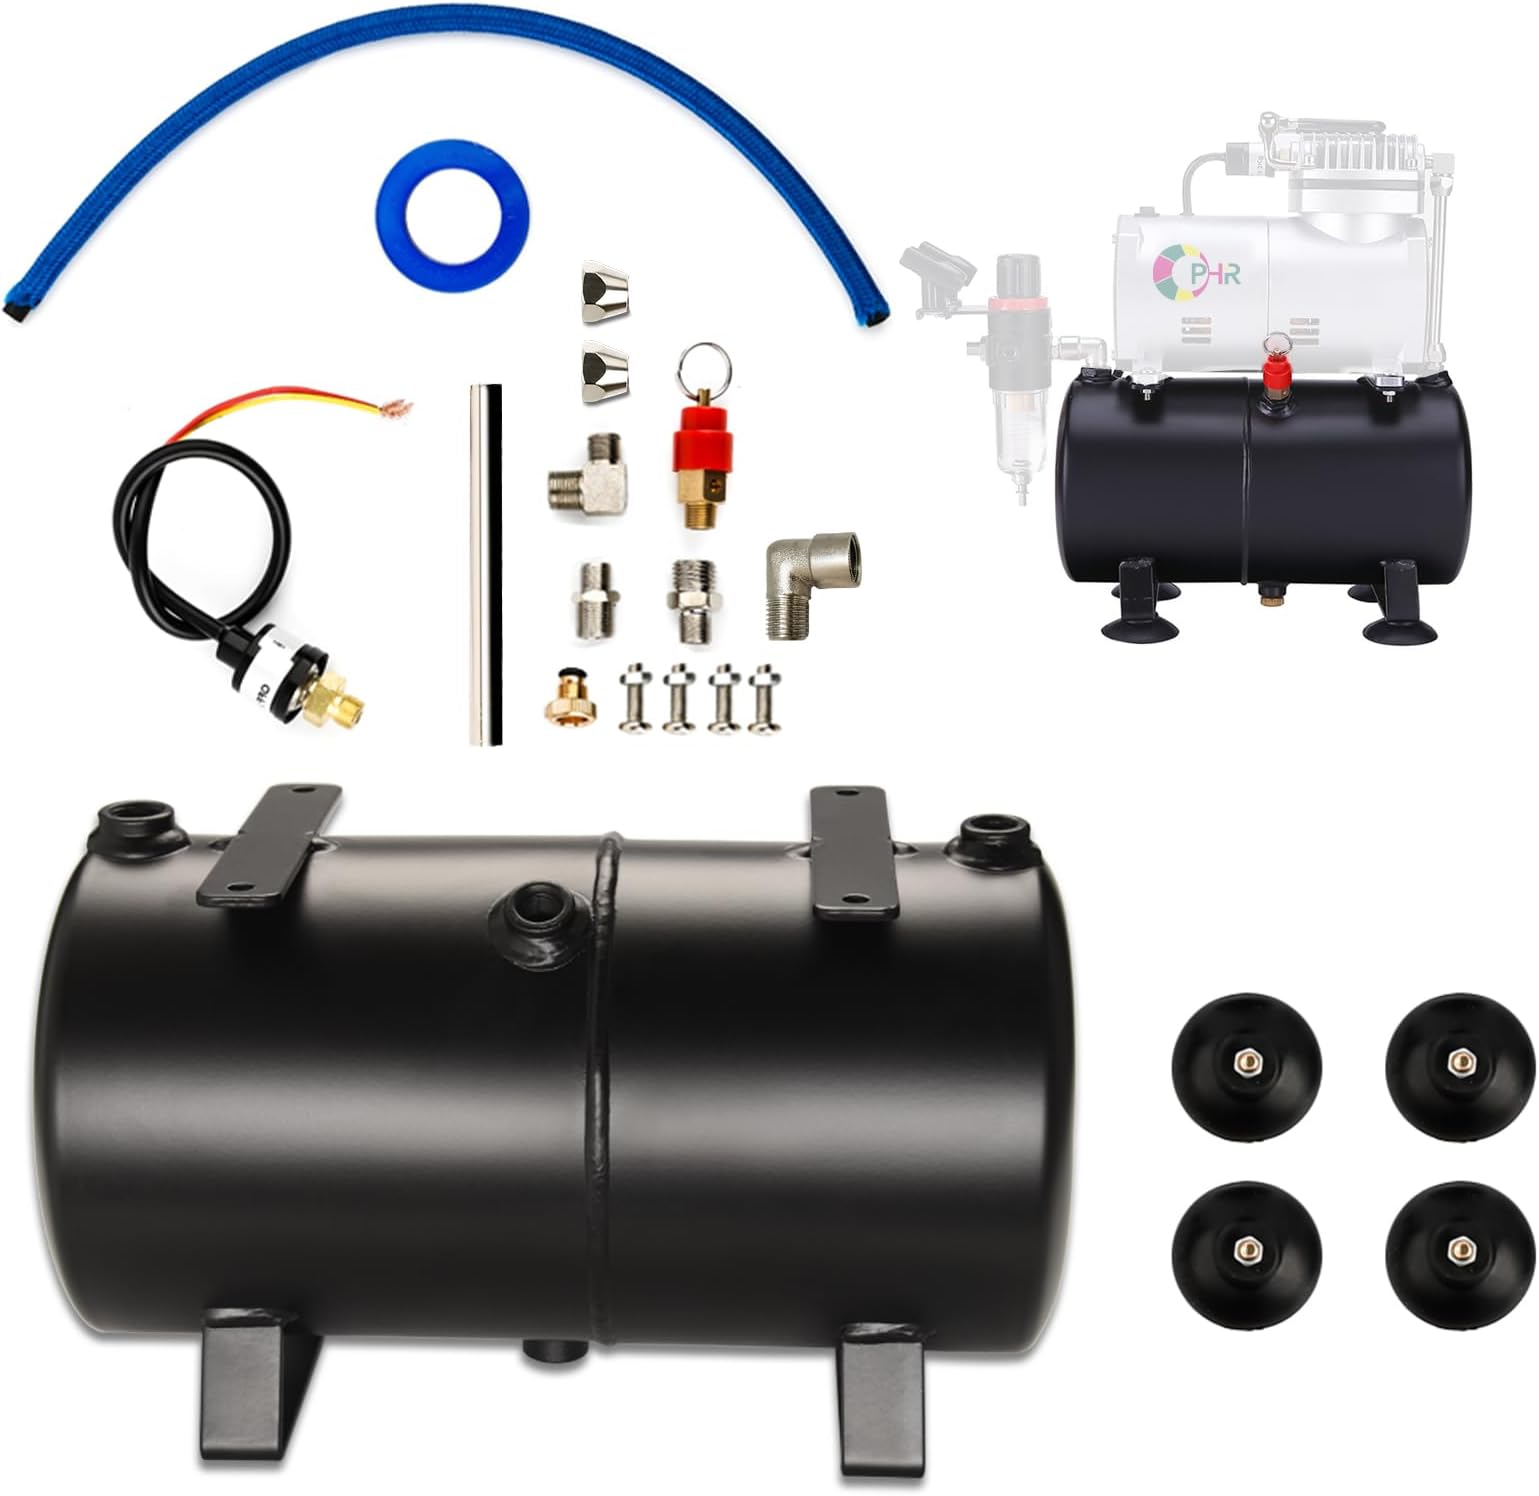
🖌️ Elevate your airbrush game with steady power and pro-grade durability!
The OPHIR 3L Air Tank Kit is a robust, lightweight air storage solution designed for hobbyist and professional airbrush compressors. Featuring a 3-liter alloy steel tank with an auto start/stop switch that maintains consistent pressure between 43-57 psi, it ensures smooth, uninterrupted spraying. The kit includes a full set of adapters, hoses, and mounting hardware compatible with most brands, making it an essential upgrade for stable, precise airbrush performance.


| ASIN | B081FS11FK |
| Batteries Included? | No |
| Batteries Required? | No |
| Best Sellers Rank | #281,074 in Tools & Home Improvement ( See Top 100 in Tools & Home Improvement ) #1,051 in Air-Compressor Accessories |
| Brand | OPHIR |
| Capacity | 3 Liters |
| Color | Silver Or Metallic Gray |
| Customer Reviews | 3.7 3.7 out of 5 stars (167) |
| Date First Available | November 13, 2019 |
| Included Components | Air Hose, Filters |
| Item Package Quantity | 1 |
| Item Weight | 3.96 pounds |
| Item model number | AC132C |
| Manufacturer | OPHIR |
| Material | Alloy Steel |
| Maximum Horsepower | 0.2 Horsepower |
| Maximum Operating Pressure | 57 Bars |
| Maximum Power | 0.2 Horsepower |
| Model Name | OPHIR DIY 3L Air Tank Kit |
| Motor Horsepower | 0.2 horsepower |
| Noise Level | 30 Decibels |
| Part Number | AC132B |
| Power Source | Corded Electric |
| Product Dimensions | 9.6"L x 5.1"W x 5.7"H |
| Recommended Uses For Product | Spraying |
| Style | Fashion |
| Tank Volume | 3 Liters |
| UPC | 769638637087 |
M**R
It goes between the compressor and the regulator, and it works.
A week or so ago I picked up the better airbrush kit at Harbor Freight. While I eventually got it dialed in to a fairly steady pressure, I realized I needed a set up with a tank. Very seriously considered taking it back, paying the restock fee, and getting something else. Did a quick search and found this. It works a treat! I get consistent pressure at the brush even with long sprays. It's true, there are no instructions, but there is a video out there of someone assembling part of it. I'll give a few pointers here, but these will be specific to the Avanti compressor from Harbor Freight. 1.) Pick up some new O rings, 1/4 in ID 3/8 in OD. The rings that come with the kit aren't great and I over tightened the first time I tried and destroyed two of them. 2.) Pick up a 1/4in by 1.5 in Nipple, I'm adding a link here, but I got mine cheaper at the local hardware store. There are other options, but this is what they had and it works. https://www.amazon.com/EDGE-INDUSTRIAL-Brass-Nipple-Length/dp/B07DCF9J2J/ref=sr_1_4?crid=346J2P7P6OVIU&keywords=1%2F4%2Bby%2B1.5%2Bnipple&qid=1652562653&sprefix=1%2F4%2Bby%2B1.5%2Bnipple%2Caps%2C93&sr=8-4&th=1 3.) The cutoff sensor on the Avanti is the same as the one that comes in the kit (3kg on, 4kg off), so no need to mess with it. 4.) You'll need either thin open end wrenches of appropriate sizes (12 mm and 14 mm) and an adjustable (crescent) wrench, or you can get away with the crescent by itself. To assemble, 0.) Attach the feet to the tank. 1.) Unscrew the regulator from the compressor. This can be tricky, but I found that using an adjustable wrench if I went lefty loosey on the bolt where the airbrush hose connects, the regulator unscrewed from the compressor. OR use a THIN* 14MM open end wrench and unscrew the connector between the compressor and the regulator directly. (THIN means 5MM or less) 2.) Remove the feet from the compressor 3.) Attach one end of the pipe to the square 90 by fitting it inside the opening and pushing two o-rings to the fitting. Loosely screw the connector on. Do not tighten as you'll need to adjust it later. 4.) Attach the other side of the square 90 to the opening where the regulator came out. Snug it down but don't tighten yet, you will need to ensure the flat side of the pipe attachment is on the front and back. The pipe will need to be vertical 5.) On the tank there is a smaller opening and a larger (1/4 in) opening, put the appropriate fitting into the smaller opening where the larger part is facing out 6.) Set the compressor on the tank fitting the pipe into the opening of the fitting you just placed, you may need to adjust the positioning of the pipe vertically to ensure it seats in both the upper and lower openings. Once that is done, pull the compressor off the top of the tank 7.) With the compressor off the tank, loosen the square 90 to a position where it is possible to tighten the compression fitting on the pipe, and ensure it is snug. Make sure the font and back have flat sides on the bolt. Tighten the Square 90 into the compressor completely ensuring the pipe is vertical. You'll see the compression fitting is nearly flush with the compressor, thus the need to have a flat side there and not a corner. Set compressor aside 8.) put the nipple into the other opening on the top of the tank, and put the rounded 90 on the other end of the nipple 9.) If you have not already done so, remove the connector from the regulator that was used to connect to the compressor, and screw the regulator in to the rounded 90 and tighten ensuring the moisture trap is down. 10.) Add the Red fitting to the of centered hole toward the top 11.) Add the drain fitting in the bottom 12.) Set the compressor back on the tank 13.) Use the included screws and nuts to attach the feet of the compressor to the tank (it will be a tight fit due to the nipple being vertical. It is possible to change this arrangement, but I didn't want my regulator sticking out from the compressor and tank.) 14.) Snug the bottom of the pipe to the fitting 15.) Plug the compressor in and fire it up. If you got really lucky you'll have no air leaks. I didn't get lucky and had to do a little rework on a couple places, but it was pretty painless. Soapy water makes it easy to see where the leak is. Note: it's going to take a some time for the compressor to kick off. Just about the time you think you messed up is when it will shut off.
P**D
Take your time with the conversion and everything will go great!
I ordered this tank conversion only to receive it with some fittings that were not even cut. Returned it for another and everything appeared ok. Some fittings even with teflon tape were loose, so of to Ace Hardware for Permatex blue thread lock. That worked great, but while connecting up the compressor discharge pipe, the Parts Gremlin, ( If you build models you will know what I mean ) got one of the rubber rings that act as a furrule for the compression fitting. Off to Ace again. They have a good inventory of O rings. I did need to order a fitting to complete the job. Remember, if you need any fittings they are BSP fittings not ASE. Now that the conversion was complete started up and worked perfect!!! No Leaks!!!
N**E
Ophir Air Tank Kit is Amazingly Helpful
This kit makes my small airbrush compressor perform so much better. There are no install instructions but it’s pretty much common sense so if you don’t have common sense stop reading right now. Everything will to be secured with need the Teflon tape to prevent air leaks, and trust me it’s not worth the time it takes to skip this step just to have to go back and re do all connections. I skipped and ended up hating my life while I went back to do things correct. All in all this unit is great and now my compressor doesn’t have to run non stop while I airbrush which is going to allow it to last so much longer and not have to strain when I work on larger projects while also allowing my airflow to be consistent and constant. This is a absolute must have if you have a small airbrush compressor without a tank!
2**C
Straight garbage, deserves negative stars!
This kit is VERY do it yourself...as in go out and try to collect parts and pieces you will need to complete it. There is a whole bag full of parts and fittings, with about half of what will be useful. Expect that your compressor will not line up with the ports and mounting locations on the tank. You will need to bend the hard supply line from the compressor head to the tank (and it doesn't bend easily). I have no idea what the flexible braided line is for because there are no fittings or clamps that would make it useful. The threads in the tank will be rusty and/or painted and need to be cleaned out or you may just end up stripping the few fittings that are useful. The big secret to all these kits (or trying to hook up your airbrush compressor to any tank) is, the fitting you need to hook up your water trap/regulator is pretty much nonexistent. It's certainly not provided in this kit. Good luck finding what you need. Chances are VERY slim it will be at any hardware stores and will be near impossible to locate online. Good luck and enjoy the extra cost! By the time you round up and pay for extra fittings you will need, you would be better off spending $80-$90 for a Timbertech compressor with tank already installed. I may look at returning this pile of steaming garbage and doing just that.
L**T
Solo le queda a los compresores que no tienen motor de enfriamiento de la parte de atrás, al mio no le quedo y es difícil ajustarlo
S**T
If your compressor looks like mine, this is a great, bolt-on kit that contains ALMOST everything you need to add a tank to your compressor for improved airbrushing. Now, as others have stated, there are no instructions with the kit, but anyone should be able to work it out with a bit of thought. I awarded this 4/5 stars. I did have to scrounge for a 1/4" brass nipple, seen in the last pic between the tank elbow and the regulator- but that's not why I docked a star off the rating. It's quite reasonable to expect to need additional fittings when taking something like this on, and I was pleasantly surprised that I only needed the one fitting. The reason that I scored this at 4 instead of 5, is the quality of the included fittings. First, the chrome pipe that goes from the compressor head to the tank: instead of having proper ferrule-type compression fittings, it uses o-rings. This makes it easy, but failure prone. I expect to have to replace them before very long. I strongly suggest lubricating the o-rings with silicone oil, silicone grease, or proper o-ring lube during installation. Do NOT overtighten the nuts! Snug them up and test the system. Only if they are leaking, should you tighten them a bit more. I also recommend bolting the compressor to the tank before snugging them up at all, but START the fitting on the threads before putting the tank bolts in. The pipe thread fittings the kit are not great, and I suggest using a good quality teflon tape like Masters, instead of the included tape. Good tape is thicker and will give you a better chance of sealing the substandard threads. NPT fittings are supposed to tighten up well before they bottom out. Regarding the included pressure switch- if your compressor looks like mine, the switch is identical and you do not need to install the new one or mess with any wiring. Despite my complaints about the fittings, this is a pretty good kit for the price point, and seems to be performing as intended. Please note that the tank drain also uses an o-ring, so you should lubricate it as well, and don't tighten it past the point where it holds air.
Trustpilot
3 weeks ago
2 weeks ago